Let me add…if your school has the budget to afford a solution like Schedule Star, VNN Scheduling, Arbiter Game, or anything of the like, this article is probably not for you. This article is for the schools looking for a working solution to communicate their schedules to their community and fans in a way that is user-friendly and…free.
I should also add that this article only applies to schools that use Google Workspace as its solution for email and the other cloud computing and productivity tools included. You may be able to accomplish the same thing with Microsoft 365, but we will not be covering that in this article.
Step 1 - Getting Set Up
Have the IT administrator at your school create a generic email account dedicated to your athletic department. We recommend keeping this simple such as athletics@ .edu or yourmascot@ .edu.
This is a critical systematic step to ensure that you have a dedicated account to manage your athletic department’s calendars. You can use this account for other athletic department needs, but it is also acceptable to only use this for the purposes of the calendar. It is critically important that this calendar(s) is not connected to and owned by your personal work email. If and when you no longer work for your school, your email and associated calendars will presumably be deactivated. The use of a generic account for the Athletic Department ensures these systems will live on amidst personnel change.
Step 2 - Adjusting Your Settings
Once you have access to your new Athletic Department email account, navigate to Google Calendar on a computer (not a phone or tablet). Be certain you are still in the new email account once you have opened up Google Calendar as this can sometimes get switched when you are logged into multiple Google accounts.
In this case, the default calendar associated with this account will serve as the Master Athletics Calendar. By Master Athletics Calendar, we mean that this calendar will ultimately be an amalgamation of all sports teams’ schedules/calendars. You will be able to view anything and everything from this one calendar.
The "anything and everything" view is sometimes helpful, but there are also situations where it is not. In those cases, you want to be able to just view an individual team’s schedule/calendar.
Once you are switched over to Google Calendar, navigate to the settings of the default calendar. You can do this by clicking the three dots to the right of the calendar that is listed toward the bottom left of the screen (the default calendar will be the first one listed under the “My calendars” section. After clicking the three dots, select “Settings and sharing.”
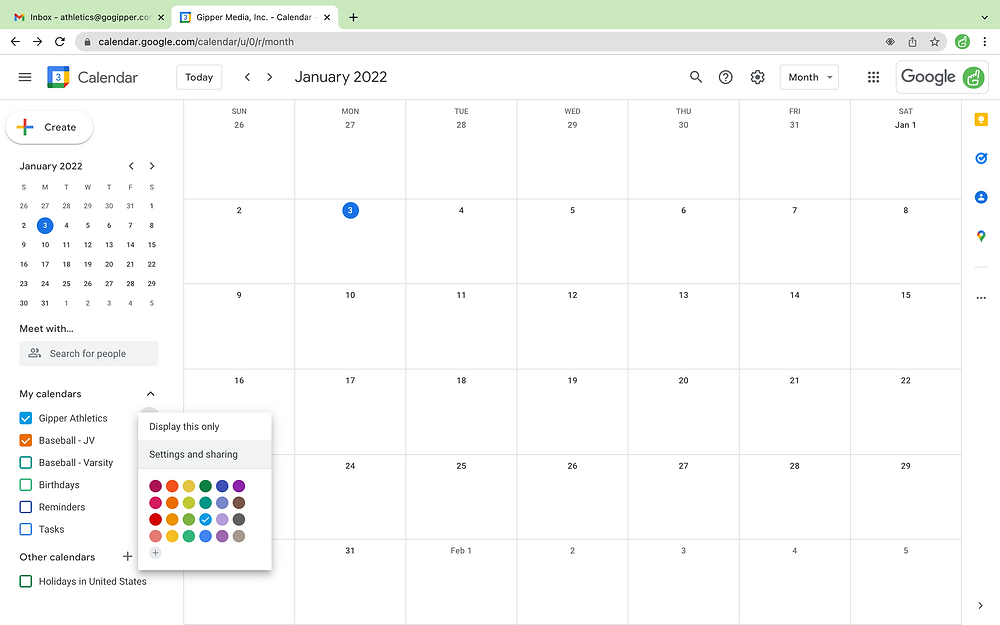
Now that you are viewing the settings, we will need to make two adjustments.
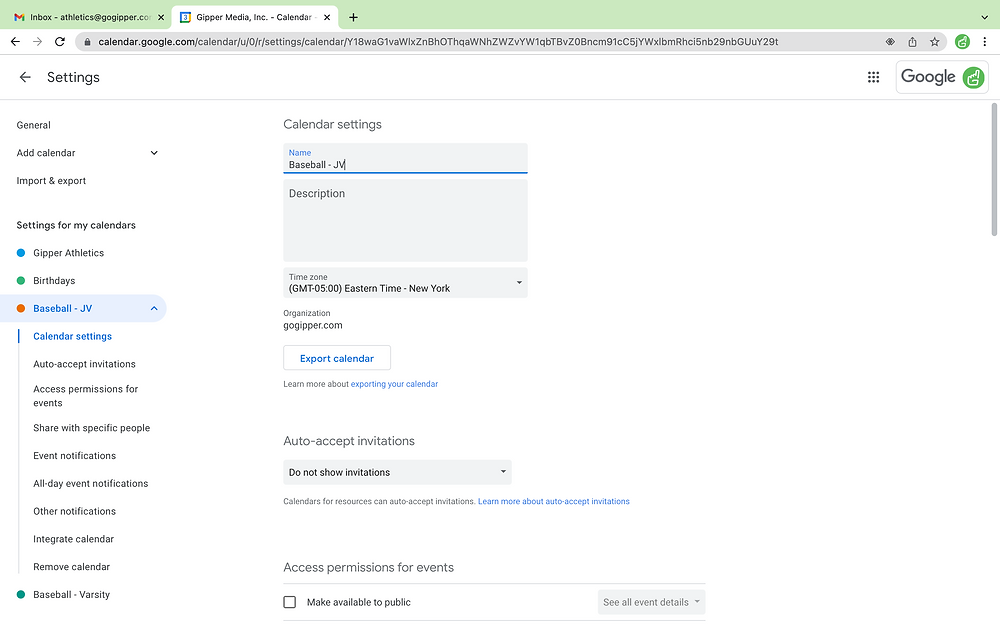
At the very top of the screen, rename the calendar to a name of your choice. We recommend choosing something like “Master Athletics Calendar” or “Main Athletics Calendar.”
This next step is optional depending on how you plan to use the “Master Calendar.” If you plan to use this for internal usage only, ignore this step. If you plan to make this publicly available, scroll down to the “Access for permissions and events” section and check the box to “Make available to public.” There is no right or wrong answer here. It is simply a matter of preference. That said, it could be nice for your fans to have one calendar to view all of the athletic happenings at a glance, so we generally recommend making this publicly available.
Step 3 - Adding Individual Team Calendars
Now that you have your Master Calendar configured, we can move on to the individual sports calendars. Next, click the plus sign beneath “Other calendars” in the bottom left of your screen, then click “Create new calendar.”
From here, input the name of the calendar. For purpose of instruction, we will use the example of a baseball team. In this case, you could name the calendar “Baseball - Varsity.”
The formatting of this is completely up to you. However, it is important to bear in mind how you plan to format any additional calendars you will need. For example, let’s say your school has two other baseball teams; Junior Varsity and Middle School. In this case, we could simply name those calendars “Baseball - Junior Varsity” and “Baseball - Middle School” and easily distinguish these calendars.
Feel free to also add a description of each calendar. You may find this helpful, but this is not a requirement.
Once you have input the name and/or description of the calendar, click “Create calendar.” From here, the calendar will now be available on the left side of your screen. Click the newly created calendar now visible on the left side of your screen.
Once you have selected the newly created calendar, you will be brought to the settings page for this calendar. This should look familiar to you as this is the same screen we viewed in Step 2. From here, you will want to repeat the second instruction from Step 2, and make the calendar publicly available.
Now, repeat Step 3 for any additional sport-specific calendars you need.
Step 4 - Adding Events to the Calendar
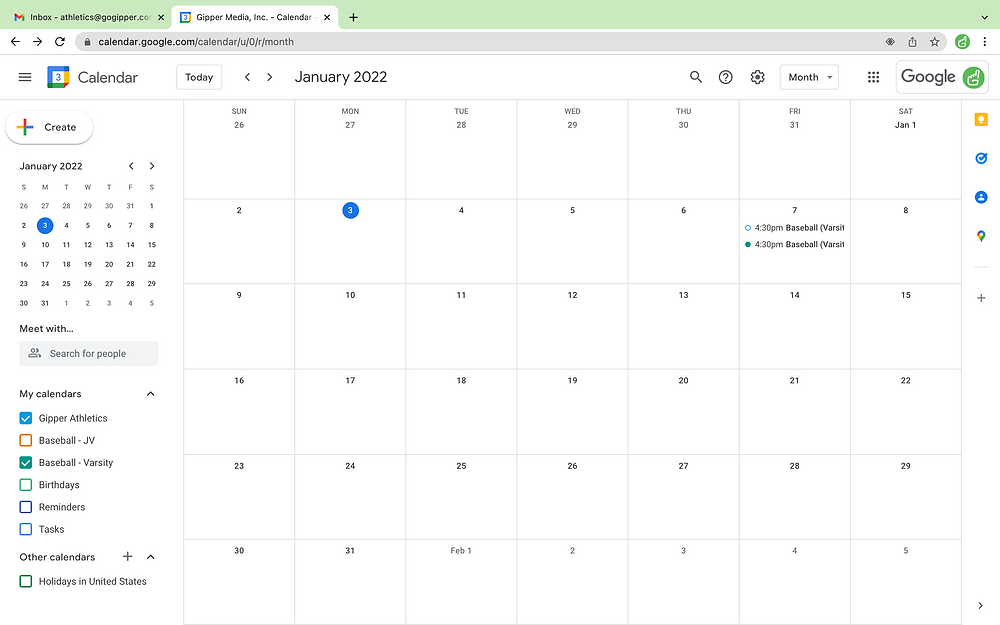
Now you’re ready to add events to the calendar! In short, the way we will sync the sport-specific calendar with the Master Athletics Calendar is by inviting the newly created email account (athletics@___.edu) as a guest to each new event created on the sport-specific calendar. Got it?
This will automatically populate the event to the Master Athletics Calendar for public viewing and will prevent you from having to create duplicate entries that are not synced. This is critically important in the case that an adjustment to an event needs to be made. In that case, all you will have to do is make the adjustment to the event on the sport-specific calendar and it will then be automatically adjusted and populated on the Master Athletics Calendar saving you precious time and mistakes!
So let’s go through this.
There are multiple ways to add an event to your calendar. We won’t go into those details here (click to learn more), but the important thing to note is to make sure that you are adding any and all events to the sport-specific calendar and not Master Athletics Calendar. This system ceases to work if you do not follow this critical step.
Begin by adding an event to the sport-specific calendar. One pro-tip is to only display the sport-specific calendar you are wanting to use. This is especially helpful when adding events in bulk as it allows you to zero in on just what you need to focus on. You can do this by clicking the three dots to the right of the name of that calendar and then selecting “Display this only.” Doing this also guarantees that any new events added are automatically created from this specific calendar and not any of the others (that is other teams or the Master Calendar).
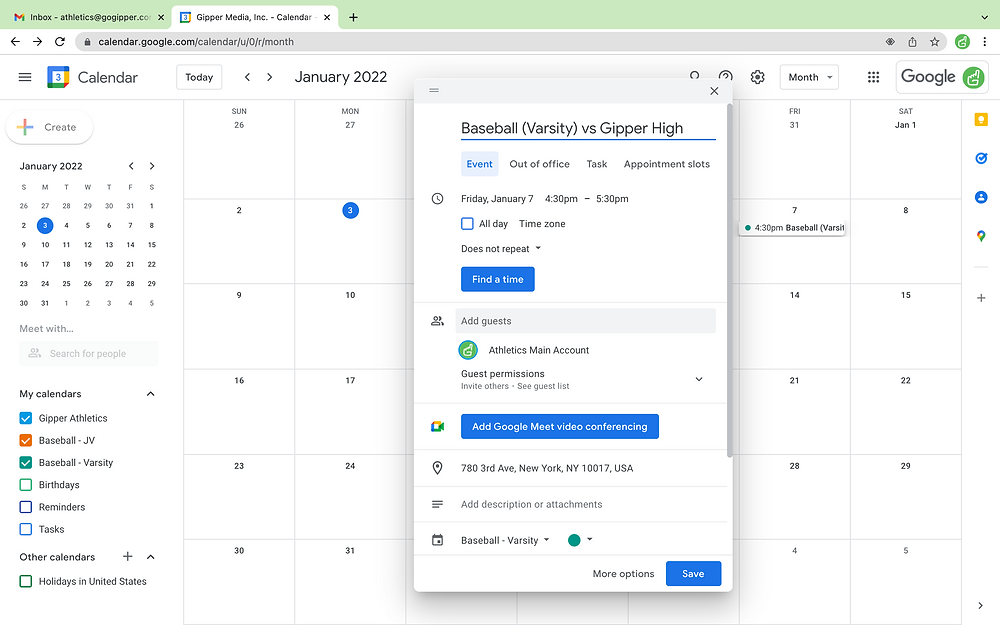
Now it’s time to input the details of the event. First up is the name/title of the event. We recommend coming up with a standardized way to do this for all event entries. For example, you could do “Baseball (Varsity) vs Gipper High School.” Choose a system that works best for you and stick with it.
From there, input the date and time of the event. Easy peasy.
Next, (this is the critically important piece!) add the newly created email account (athletics@___.edu) as a guest to the event. Note that there is nothing to do beyond this step. You do not need to accept the event from the new email account. Just sit back and relax and let the magic happen.
Next up, enter the location of the event. This is s super helpful piece of information as this section is integrated with Google Maps. Meaning your fans/players should have no excuse and should always show up to the right place! This is obviously especially helpful for away games.
Optionally, feel free to add a description to the event. This could be any extra information that you feel could be relevant or helpful.
Finally, double-check the calendar selection (toward the bottom) and make sure this is the correct calendar to add this event to. Once you have done that, click save.
Step 5: Add to Your Website, App, etc.
The great thing about Google Calendar is that it integrates with just about everything. Have the IT administrator at your school embed the Master Athletics Calendar and the sport-specific calendars to your school website.
You can easily access the embed code by returning to the "Settings and sharing" section, scrolling down to the "Integrate calendar" section, and copy/paste the embed code to your website or app if you have one. Click here to learn more.
If you do have an app, it's possible that your app integrates with Google Calendar making it even easier to display your schedules in the app all while preventing the need for duplicate entry or updates.
Another plus to using Google Calendar is that fans can "subscribe" to your calendar and add the schedule to their personal calendar. Read more about how to do that here.
Wrap Up
So there you have it! A full solution for using Google Calendar for athletics schedules. Making sure your schedules are easily accessible is an important piece to running a smooth athletic department. Using a dynamic tool like Google Calendar is even better.
I hope this helps and thanks so much for reading!
- Chaston
Chaston Hart is a School Marketing Specialist at Gipper. Gipper is a platform that helps high schools create professional visual content for social media - in seconds, on any device, and without needing any design experience.
Learn more @ gipper.com